 Save
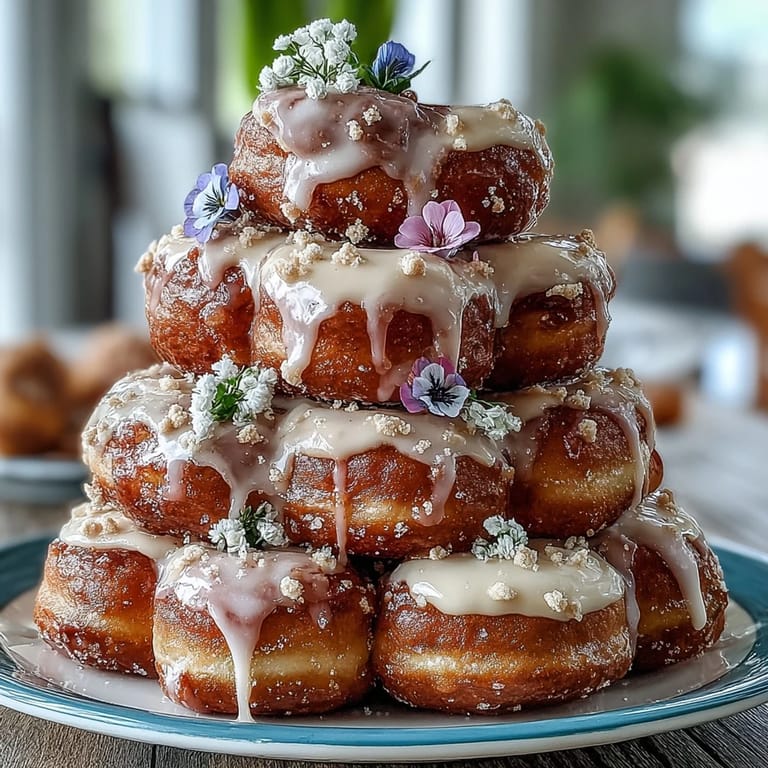
Save My cousin texted me a photo of a donut tower she'd seen at someone's baby shower, and honestly, I was skeptical at first—it looked almost too whimsical to pull off at home. But then I realized the genius of it: no baking required, just beautiful assembly and a handful of edible flowers to transform something simple into a showstopper. That afternoon, I found myself at the kitchen counter with a foam cone, mini donuts, and this ridiculous idea that felt less impossible by the minute.
I made my first tower for a surprise baby shower last April, and watching my friend's face when she saw it sitting on the dessert table was everything—she didn't believe I'd made it myself. What I didn't expect was how the tower became the unofficial centerpiece of the whole event, with guests sneaking donuts from the lower tiers when they thought nobody was looking. By the end of the afternoon, it had transformed from a pristine tower into this charmingly deconstructed creation that somehow looked even better half-eaten.
Ingredients
- Mini Donuts (36–40): These are your foundation, and honestly, quality matters more than you'd think—stale donuts won't hold the glaze as prettily, so grab them fresh from a local bakery if you can.
- Powdered Sugar (1 cup): The base of your glaze, and sifting it first prevents lumps that'll make your coating look grainy instead of silky.
- Milk or Water (2–3 tbsp): Start with less liquid than you think you need; you can always add more, but you can't take it back once your glaze is too thin.
- Vanilla Extract (1/2 tsp, optional): A tiny whisper of vanilla elevates the glaze from plain to memorable without overpowering those delicate flower flavors.
- Food Coloring (optional, pastel shades preferred): Pastel hues feel more sophisticated and work better with spring flowers than bright neons—gel coloring mixes smoother than liquid.
- Rainbow or Pastel Sprinkles (1/4 cup, optional): These add texture and whimsy while the glaze is still tacky; wait too long and they'll slide right off.
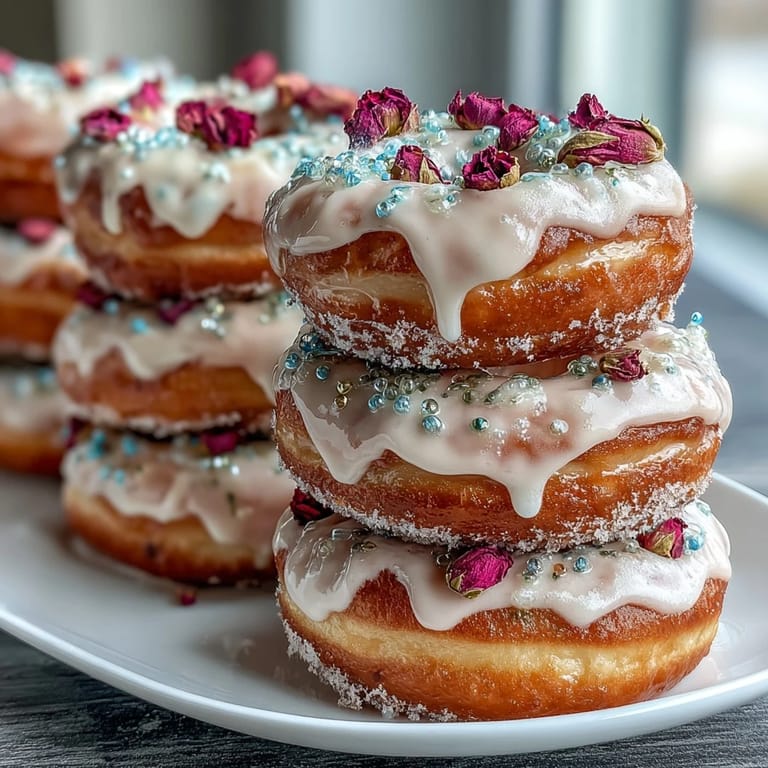
- Edible Flowers (1 cup—violets, pansies, nasturtiums, or marigolds): This is where the magic happens, and I learned the hard way that farmer's market flowers are sometimes treated with pesticides, so order food-grade edibles online or grow your own if you're unsure.
- Fresh Mint Leaves (optional): A few scattered mint leaves add greenery and keep everything from feeling too heavy on the sweetness.
- Foam Cone (10–12 inches) or Tiered Cake Stand: The cone is more dramatic and romantic, while the stand is easier to eat from—choose based on your vibe.
- Toothpicks or Wooden Skewers: These are your invisible helpers; soak wooden ones briefly in water first so they don't splinter when you push them through the foam.
Tired of Takeout? 🥡
Get 10 meals you can make faster than delivery arrives. Seriously.
One email. No spam. Unsubscribe anytime.
Instructions
- Make Your Glaze (if using one):
- Sift your powdered sugar into a bowl and whisk in milk or water a tablespoon at a time until you reach that perfect pourable consistency—it should coat the back of a spoon but still drip slowly. Vanilla and pastel food coloring go in now, whisked until the color is even and dreams-like.
- Glaze and Decorate the Donuts:
- Working quickly while the glaze is still wet, dip each donut halfway into the mixture and flip it back out with a gentle twist, letting excess drip away. Immediately sprinkle the tops while they're tacky, then set them on parchment paper to dry for at least fifteen minutes.
- Prepare Your Base:
- Place your foam cone on a serving platter (I like using a cake board for stability), or set up your tiered stand on whatever surface will be its forever home. This isn't the moment for last-minute moves.
- Build the Tower from Bottom to Top:
- Starting at the base, insert toothpicks at slight downward angles and slide mini donuts onto them in overlapping circles, like you're building a delicious spiral staircase. Work your way up slowly, making sure each layer sits snugly against the one below.
- Tuck in the Flowers and Greenery:
- Now comes the beautiful part—nestle edible flowers and mint leaves into the gaps between donuts, turning it from a geometric shape into something that looks like it bloomed naturally. Don't overthink placement; organic-looking arrangements are actually easier and lovelier.
- Fill the Gaps:
- Step back and look for any bare spots where foam is peeking through, then fill them with extra flowers, sprinkles, or smaller donut pieces tucked strategically into crevices. This is where your eye becomes more important than any instruction.
- Chill or Serve:
- If you've made this a few hours ahead, cover it loosely with plastic wrap and refrigerate—it'll keep beautifully for up to four hours and actually tastes better slightly chilled. If you're serving immediately, give it one final look and maybe add a final flourish of mint.
 Save
Save There's something about watching a tower you've built transform a plain dessert table into a garden centerpiece that makes you feel like a kitchen magician, even though you didn't actually cook anything. My friend still texts me photos of that tower from last spring every time someone mentions baby showers, and I've made at least five since then—each one slightly different, but all of them equally magical.
Choosing Your Donut Flavors
The most successful towers I've built mixed textures and flavors intentionally—some glazed donuts, some chocolate, some with fun flavors like maple or lemon. I learned that having visual variety keeps the tower from looking monochromatic, and flavor variety means guests actually want to eat more than one. That said, don't overthink it; even a tower of all-vanilla donuts becomes stunning once you add the flowers and glaze.
Making It Baby Shower Ready
If you're building this for a specific celebration, align your colors with the shower's theme—soft pastels for a gentle garden vibe, brighter colors for something playful. The flowers do most of the thematic heavy lifting, but your glaze color and sprinkle choices tie everything together. I've made towers in soft pinks and yellows, cool blues and whites, even monochromatic pastels that felt very sophisticated.
Storage and Make-Ahead Strategies
The beautiful thing about this tower is its flexibility—you can assemble it fully the morning of an event, loosely cover it, and it'll hold beautifully in the fridge. If you're worried about glaze sweating or flowers wilting, assemble everything except the flowers an hour or two ahead, then add your florals just before guests arrive. Fresh edible flowers are tougher than they look and won't wilt quickly, but they do look prettier when they haven't been sitting in the cold for too long.
- Pre-glaze and sprinkle your donuts the night before, then store them in an airtight container so they stay fresh and pretty.
- If you're using a foam cone, you can prep it by gently testing where your toothpicks sit best before donut-assembly day—saves time when you're in the zone.
- Transport the finished tower in a sturdy box with parchment paper underneath to catch any glaze drips, and drive carefully because even though it looks delicate, it's surprisingly resilient.
 Save
Save This tower is proof that the most impressive desserts sometimes require zero baking skill and maximum creativity. Every time you make one, you're not just assembling a tower—you're creating a memory that tastes as good as it looks.
Recipe Questions
- → What type of donuts work best for the tower?
Use plain, glazed, or assorted mini donuts, depending on your flavor preference. Pre-made donuts save time and maintain shape well.
- → How do I secure the mini donuts on the tower?
Attach donuts to the foam cone or tiered stand using toothpicks or wooden skewers, starting from the base and overlapping upward for stability.
- → Can I customize the icing colors?
Yes, add food coloring to the sugar glaze for pastel shades that complement the edible flowers and event theme.
- → Which flowers are safe to use for decoration?
Choose pesticide-free edible flowers like violets, pansies, nasturtiums, and marigolds to ensure safety and beauty.
- → How long can the tower be stored before serving?
Cover loosely with plastic wrap and refrigerate for up to 4 hours to keep freshness and structure intact.