 Save
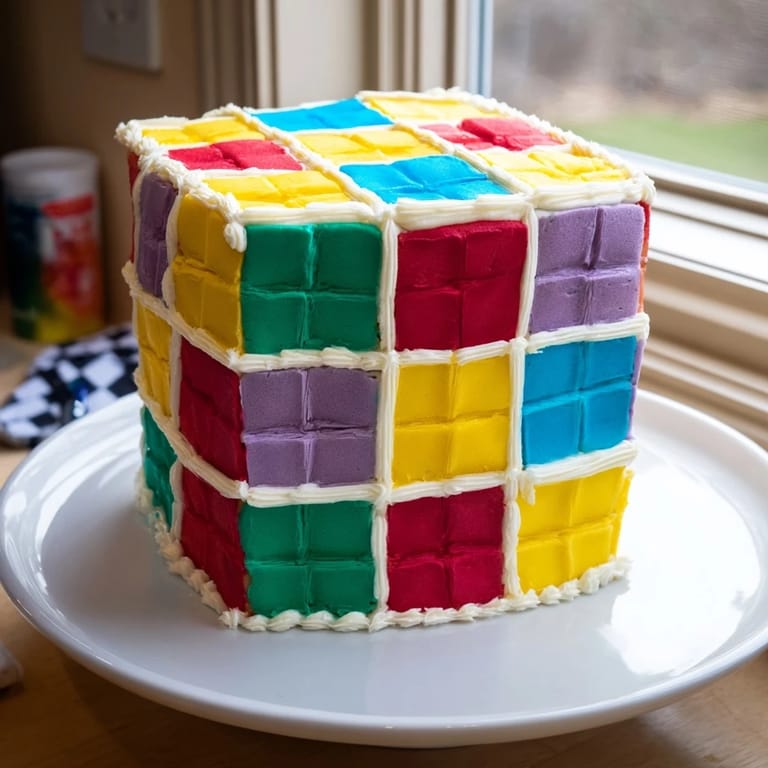
Save I discovered this cake years ago at a small craft fair where a baker was selling slices of the most mesmerizing dessert I'd ever seen. It looked like an edible quilt, with perfectly arranged squares in jewel tones that seemed to glow under the lights. When I finally tried a piece, the soft sponge and silky frosting made me realize I had to recreate this magic at home. Now, every time I bake this Cozy Quilt Patchwork Cake, I'm transported back to that moment of wonder, and I watch my own family experience the same joy I felt.
I'll never forget my daughter's birthday when I made this cake for the first time. She stood in the kitchen watching me arrange those colorful squares, her eyes growing wider with each layer. When she tasted it, she declared it tasted like happiness looked, and honestly, I couldn't have said it better myself.
Ingredients
- All-purpose flour (350 g): The foundation of your sponges, measured by weight for precision that prevents dense cake disasters.
- Granulated sugar (300 g): Creates lift when creamed with butter, and trust me, this step isn't worth rushing through.
- Baking powder (2½ tsp): Your secret weapon for clouds of air that make each sponge tender rather than heavy.
- Salt (½ tsp): A tiny amount that enhances sweetness and prevents the frosting from tasting one-dimensional.
- Unsalted butter (250 g for cake, 350 g for frosting): Cold butter creams better, so chill your hands and let it sit at room temperature if it's too hard to work with.
- Large eggs (4): Bring them to room temperature or they'll refuse to blend smoothly into your batter.
- Whole milk (250 ml): Added in turns to create a batter that's perfectly tender without being gummy.
- Vanilla extract (2 tsp for cake, 2 tsp for frosting): Use pure extract, not imitation, the difference is quietly profound.
- Food coloring gels (red, yellow, green, blue, purple): Gel over liquid means your batter stays thick and your colors stay vibrant, a lesson I learned after a watery disaster.
- Powdered sugar (500 g): Sifted before measuring if you have time, but honestly, whisking it in works fine too.
Tired of Takeout? 🥡
Get 10 meals you can make faster than delivery arrives. Seriously.
One email. No spam. Unsubscribe anytime.
Instructions
- Prepare your canvas:
- Preheat your oven to 180°C (350°F) and grease five 20 x 20 cm square pans until they shine. Line them with parchment paper that overhangs slightly, making it easier to lift your finished cakes out. If you don't have five pans, don't worry—bake in batches and rest assured the results are just as beautiful.
- Cream the foundation:
- In a large bowl, beat your softened butter and granulated sugar together with an electric mixer. Watch as it transforms from a dense mixture into something pale and fluffy, about 3-4 minutes. This is where air enters your cake, so don't skip this step. Beat in your eggs one at a time, letting each one fully incorporate before adding the next. Finish with vanilla extract and watch the batter become silky.
- Build the dry mix:
- In a separate bowl, whisk together flour, baking powder, and salt. This aerates the flour and distributes the leavening evenly, preventing dense pockets later.
- Marry the wet and dry:
- Add your flour mixture and milk to the egg mixture in alternating additions, starting and ending with flour. Stir just until combined—overworking develops gluten and makes your cake tough. The batter should look creamy and smooth, ready for its colorful transformation.
- Paint with color:
- Divide your batter evenly among five bowls. Add a different gel food coloring to each, starting with just a few drops and mixing well. The colors should be jewel-toned and vibrant, not pale or washed out. If you want to taste the batter (yes, it's safe), this is the moment to check that the flavor still sings.
- Bake your colored squares:
- Pour each colored batter into its prepared pan, spreading gently to the edges with a spatula. Bake for 20-25 minutes until a toothpick inserted in the center comes out clean and the edges are just beginning to pull away from the pan. The smell will be incredible.
- Cool with patience:
- Let the cakes cool in their pans for 10 minutes, then turn them out onto cooling racks. This is when you'll see the colors for the first time fully set—a moment that never gets old. Let them cool completely before moving forward.
- Prepare your frosting glue:
- While cakes cool, beat softened butter until it's pale and creamy, about 2 minutes. Gradually add powdered sugar and a pinch of salt, beating as you go. Add vanilla extract, then milk one tablespoon at a time until your frosting reaches a spreadable consistency. It should be thick but not stiff.
- Cut your patchwork tiles:
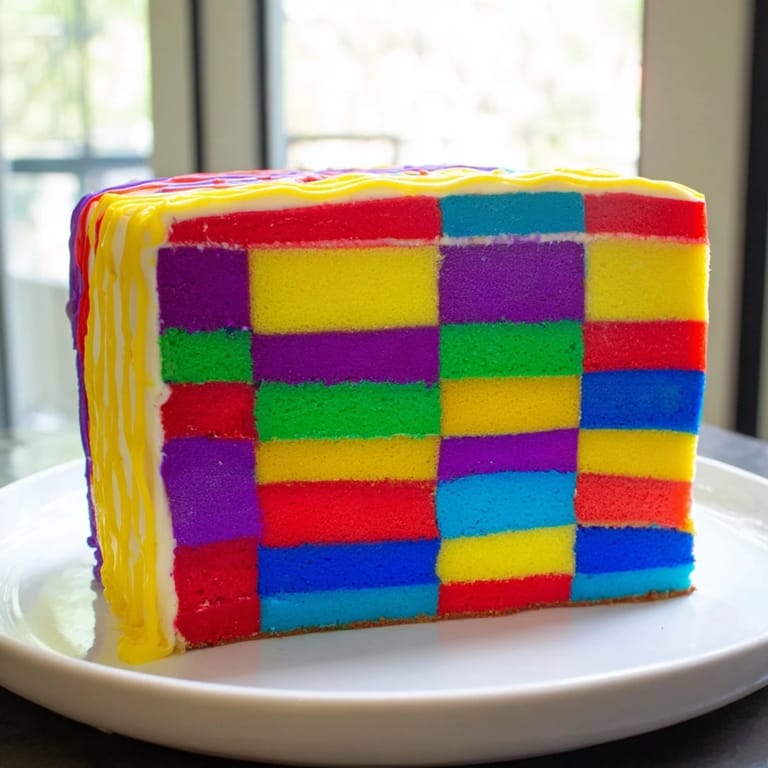
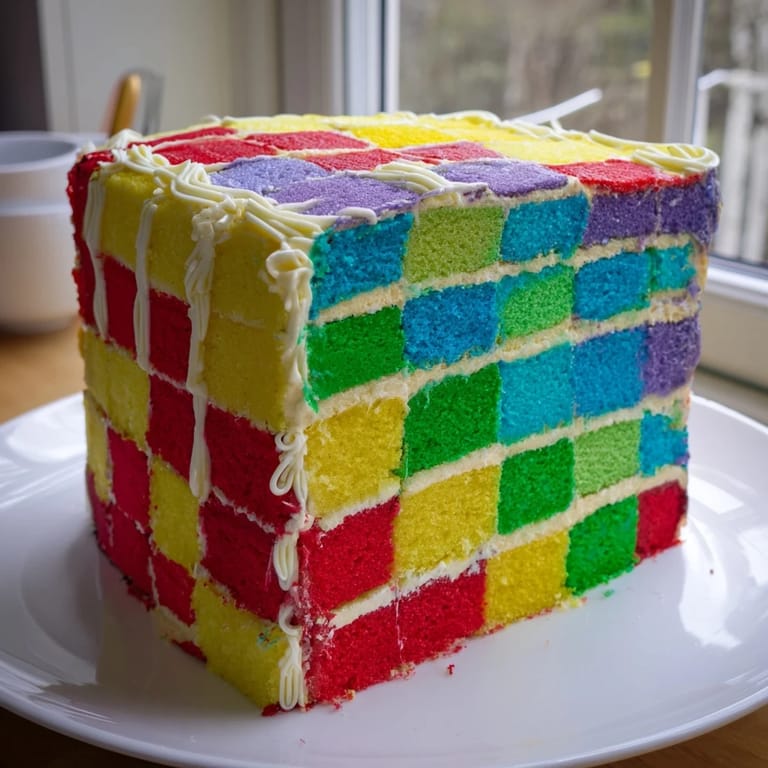
- Trim the edges of each colored sponge so they're neat and even. Then, slice each sponge into uniform 3 x 3 cm squares. This is meditative work—your squares don't have to be perfect, but close enough matters for the visual effect.
- Assemble the quilt:
- On a large tray or plate, begin arranging your squares in an alternating color pattern, like a real patchwork quilt. Use a thin layer of buttercream between each square to hold them together. Build in layers, rotating your color pattern as you go. This is where the magic happens and your cake begins to look like edible art.
- Frost and finish:
- Cover the top and sides with a thin, smooth layer of buttercream. Step back and admire your work. If you're feeling inspired, pipe buttercream lines along the squares to enhance the quilted effect, or leave it simple and let the colors speak for themselves.
- Final chill:
- Refrigerate for 30 minutes before slicing. This helps the layers set and makes cutting cleaner. When you do slice into it and reveal that patchwork interior, you'll understand why this cake is worth the effort.
 Save
Save The real magic of this cake isn't just how it looks on the plate—it's how it brings people together. I've watched stern relatives soften when they see the patchwork pattern, watched children ask for seconds, watched this simple arrangement of colored cake and frosting become the conversation starter at every dessert table.
The Art of Color Matching
Choosing your colors matters more than you might think. I've found that jewel tones—deep reds, rich emeralds, true purples, and golden yellows—create a more sophisticated look than pastel shades. The gel coloring I use comes in small bottles and a tiny amount goes a long way. Start conservatively and build up your color intensity, because once you've tinted a full bowl of batter, there's no turning back. I keep a little white batter aside before tinting to serve as a neutral palette cleaner between colors.
Building Stability in Layers
The secret to a cake that holds together beautifully during serving lies in how you frost between layers. A thin but consistent layer of buttercream acts like edible glue, holding your squares together while remaining invisible between bites. I use an offset spatula or butter knife to spread it evenly, making sure each square touches its neighbors with frosting in between. The longer you chill before serving, the more stable everything becomes, so patience truly pays off here.
Creative Variations and Serving Suggestions
This cake is a blank canvas for your imagination. Once you've made the basic version, you'll start seeing endless possibilities—try citrus zest in the batter for brightness, or a hint of almond extract for subtle depth. A thin layer of jam between squares adds unexpected flavor. For serving, whipped cream lightens each bite beautifully, and fresh berries tucked between squares add color and freshness that feels almost as much a celebration as the cake itself.
- For extra flavor dimension, brush each cooled square with a light simple syrup made from equal parts sugar and water, optional but transformative.
- If you're short on time, a more rustic patchwork pattern using larger squares still creates the same stunning effect with less cutting required.
- Store covered in the refrigerator for up to three days, though somehow it never lasts that long once people taste it.
 Save
Save This cake has become my love letter to the idea that beautiful things don't have to be complicated—just thoughtfully made with attention to detail and a little bit of heart. Every time someone cuts into it and discovers the hidden patchwork, I'm reminded why I love cooking.
Recipe Questions
- → How do I achieve the vibrant colors in the sponge layers?
Use gel food coloring gels to tint the batter evenly without affecting its texture, ensuring bright and consistent colors.
- → What is the best way to ensure the sponge squares bake evenly?
Bake each colored batter in square pans of the same size and thickness; bake in batches if necessary and test with a toothpick for doneness.
- → How can I assemble the patchwork effect neatly?
Trim the cake edges and cut into uniform squares, then layer using a thin layer of buttercream as glue, alternating colors carefully for a quilt-like appearance.
- → Can I prepare this dessert ahead of time?
Yes, chilling the assembled cake for 30 minutes helps the layers set and enhances flavor, making it convenient to prepare in advance.
- → What substitutes can I use for dietary restrictions?
For gluten-free options, replace all-purpose flour with a 1:1 gluten-free flour blend, and consider almond extract or citrus zest to adjust flavor.
- → How should leftovers be stored?
Store the cake covered in the refrigerator to keep the buttercream fresh and the sponge moist for up to 3 days.